Sunday 22 January 2012

Afghan Dans welcome home present

Our faithful gimp  Dan has been sorely missed since he buggered off to Afghanistan, but he is pulling all the stops out to make it for the first race of the season as he makes a fleeting visit before going off to Canada!! He will also be around for the meeting at Donington the end of June which also hopefully means he will about for one more race towards the end of the season. With that in mind we thought we had better make him a decent kitchen   for him to knock up the food and wash all the plates up, lol!!!

The sink, hob and water heater all came from the old caravan, we also had cupboard doors and draws but they just looked a bit too scruffy, so a trip down B&Q found these along with the thin 28mm work surface for a very reasonable price. One thing we're concerned about is that the body of the bus obviously flex's, if you look at the rear doors as you drive along you can see them sliding up and down each other as the body rocks from side to side. If the body was to do that with the kitchen unit fixed to the sides and floor it would undoubtedly lead to the kitchen being ripped apart, so the idea was to hand everything from the side of the bus, with the end panels only resting on the floor. Ok it can still be compressed as the bus flex's in one direction, but the chipboard is a lot stronger in compression than in tensile loads through the screws.

Anyway this is how it has progressed over the past couple of weeks. There are a few finishing off bits to do, then get everything connected.


Monday 2 January 2012

Creature Comfort???

One of the biggest pains in the paddock is the lack of hot water in the bus, so next up is the kitchen. We mainly live on BBQ's, slow cooker meals and bacon sarnys during a race weekend, so although we have an oven and a grill ready to fit, we decided that we should only fit what we will actually use, so the kitchen unit will house a hob, sink (with hot water), fridge (3way) and a microwave. This area will also be the control center of the bus, housing the gas bottle, water heater and electricity/charging unit.
A rough layout of the 3 main items,based on where the main box section structure of the bus is allowing holes to be cut through the skin without hitting any of these:-


It was pretty scarey attacking the body of the bus with an angle grinder, creating large holes!!

 The holes where squared up after the initial attack.....
 Water heater fitted, internal view
 Water heater fitted external view, oh and a whacking great hole for the gas bottle access door. As we are tight on space we decided to go for the smallest bottle, a 4.5kg butane item, but will ensure the pipe is long enough to allow us to use a larger bottle on the floor outside the bus if we run out while away for the weekend and no one has a small bottle available locally.
 The nasty 80's caravan thetford toilet door taken at the same time as the cushions:-
And now painted and the panel cut out from the bus side inserted in place of the beige panel above. Must admit we are very happy with how this came out!!
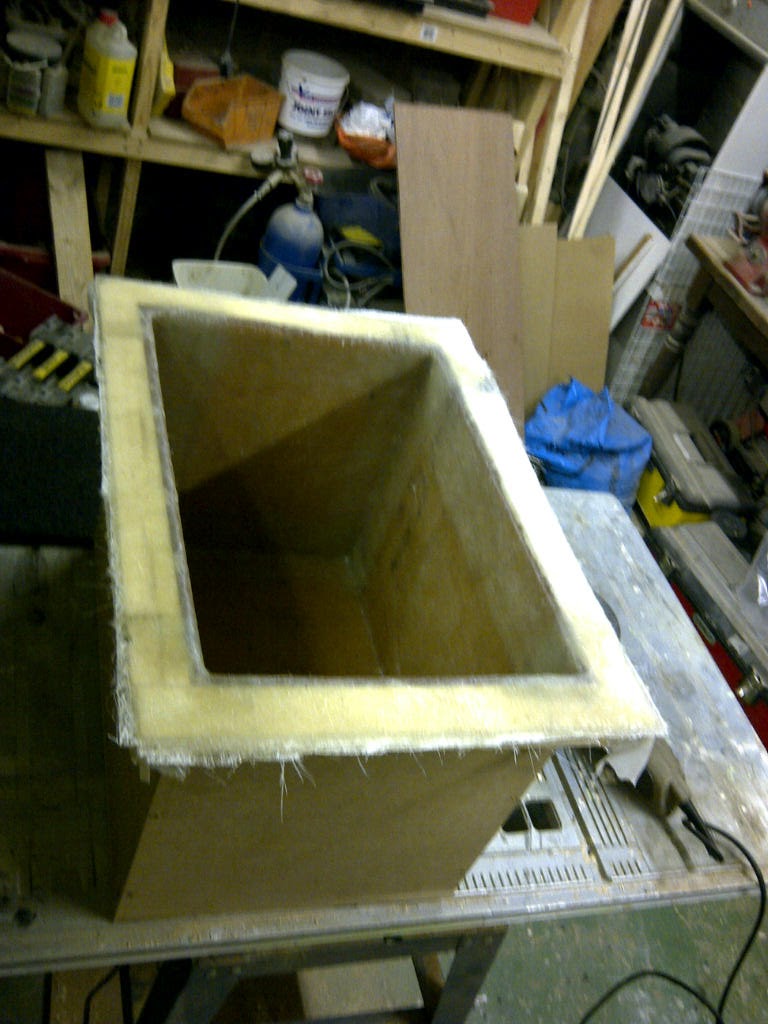
I think there is some kind of law that says the gas bottle must be completely sealed from the inside of the vehicle (or in a separate external box), weather this is true or not i thought it was best for our own safety, especially after smelling Bobs leak from his gas bottle in the motorhome last year. I was initially going to make a mold from MDF and cast a GRP box from it, but decided to make an the MDF box and cover it internally in GRP to ensure it was airtight.
Yet again it has turned out immensely over engineered, but i actually think that if the gas bottle exploded the box would stay intact!!! A bit like a flight recorder in reverse.......
Gas box fitted above the water heater:-
Gas bottle in the "blast chamber"

The Cat Flap

With the rear beds made, it was time to close off the beds from the the back door and also the top bunk from the storage space accessed through the upper rear door. The upper bunk just needed a bulkhead adding which was simply done by an MDF panel covered in carpet. The lower bunks needed a door that could be folded up out of the way for transport and we also had an idea that it could double up as a roof for the tool kit during the inevitable RGB race meeting rain if it folded outside the bus. And so the catflap was born. Simply a piece of 1/8" ply with an edging strip:-

 Covered on one side in 2 layers of 300gsm GRP to stiffen it up and make it water proof:-
Sprayed black and the opposite side (internal) covered in carpet, various bathroom door latches to hold it in its 3 different positions and 2 rather funky hinges made from 4 gate post hinges that positions the pivot point to allow the desired degrees of rotation.
Then mounted to the underside of the upper bunk. The rather blurry picture below shows the upper bulkhead fitted and the Cat flap in the "sleeping mode!

This picture shows the cat flap in the "keep the bloody rain off the tools mode". 2 bathroom door latches go into the back doors to hold it up, plus 2 sandwich type ears that stop the doors from opening up and the roof dropping. Its hard to explain, but once its all latched in its very very secure and even an Anglesey style storm shouldn't bother it.